Python连接redis
下载redis
pip install redis快速上手:
import redis

# 创建连接对象,后续操作都是通过连接对象来操作,方式1
conn1 = redis.Redis(host='127.0.0.1', port=6379, password='1234', encoding='utf-8', decode_responses=True, db=0)

# 创建连接对象,后续操作都是通过连接对象来操作,方式2
conn2 = redis.Redis.from_url("redis://:1234@127.0.0.1:6379/0")
conn1.set('k1', 'v1')
print(conn1.get('k1'))

conn2.set('k2', 'v2')
print(conn2.get('k2'))
连接池ConnectionPool
通常情况下,当我们操作redis时,会经过创建并建立连接对象,执行redis操作,操作完成之后,释放连接。
一般情况下, 这是没问题的, 但当并发量比较高的时候, 频繁的连接创建和释放对性能会有较高的影响。
所以,并发场景较高的时候,我们会采用连接池。
其原理就是通过预先创建多个连接,当进行redis操作时,直接获取已经创建的连接进行操作, 而且操作完成后,不会释放,用于后续的其他redis操作,这样就达到了避免频繁的redis连接创建和释放的目的,从而提高性能了。
import redis

pool = redis.ConnectionPool(
    host="127.0.0.1",
    port=6379,
    password="1234",
    db=0,
    max_connections=100,
    decode_responses=True  # 如果使用这个参数,那么必须在连接池中声明
)
conn = redis.Redis(connection_pool=pool)
conn.set('k1', 'v1')
print(conn.get('k1'))
conn.close()简单说下连接池的原理,在ConnectionPool类中,主要维护了:
_available_connections可用连接列表。_in_use_connections正在使用的连接集合。
在执行操作时,其获取连接时执行get_connection方法,该方法中,获取连接的过程是:
- 从可用连接列表中尝试获取连接,如果没有获取到,则生成一个连接对象,同时将该对象添加到可用连接列表中。
- 将获取到的,或者新生成的连接对象添加到正在使用的连接集合中。
那么操作执行完,连接对象又是如何处理的呢?在release方法中,将连接从_in_use_connections正在使用的连接集合中拿出来,放回到可用的连接列表中,这样后续连接就可以复用这个连接了。
通用操作
import time
import redis

# 创建连接对象,后续操作都是通过连接对象来操作,方式1
conn = redis.Redis(host='127.0.0.1', port=6379, password='1234', encoding='utf-8', decode_responses=True, db=0)


# ------------------ 通用操作 ------------------
print(conn.keys("*"))  # 获取当前数据库下所有的key,尽量避免在生产中使用

# 返回k1的value类型
print(conn.type('k1'))  # string

# 判断 key 是否存在
print(conn.exists('k1'))  # 1
print(conn.exists('k8888'))  # 0

# 重命名
conn.rename('k1', 'k11')
print(conn.get('k11'))

# 删除key,key不存在返回0,key存在,且删除成功返回1
print(conn.delete('k2'))

# 设置过期时间
conn.set('k1', 'v1')  # 起始是没有过期时间的
time.sleep(5)
conn.expire('k1', 10)  # 给它设置上过期时间
conn.persist('k3')    # 取消过期时间

# 返回key的剩余过期时间
conn.set('k1', 'v1')
print(conn.ttl('k1'))  # -1 表示没有设置生存时间
conn.set('k1', 'v1', ex=10)
print(conn.ttl('k1'))  # 10
time.sleep(2)
print(conn.ttl('k1'))  # 8

# 返回数据库中key的数量,生产可用
print(conn.dbsize())

# 清空数据库的所有key,生产禁用
print(conn.flushall())  # True
print(conn.dbsize())    # 0
字符串string
基础操作
import redis

# 创建连接对象,后续操作都是通过连接对象来操作,方式1
conn = redis.Redis(host='127.0.0.1', port=6379, password='1234', encoding='utf-8', decode_responses=True, db=0)


# ------------------ 字符串操作 ------------------

# 设置一个值
conn.set('k1', 'v1')  # 没有过期时间限制
conn.set('k1', 'v1', ex=10)  # ex: 过期时间:秒

# 设置一个值,带过期时间
conn.setex('k2', 10, 'v1')  # 过期时间:秒

# 先get,不存在返回None,存在返回上一次的值,然后再设置一个新值
print(conn.getset('k1', 'v11'))
print(conn.get('k1'))

# 如果key不存在,就设置一个key:value,如果key存在则什么都不做
conn.setnx('k3', 'v3')
print(conn.get('k3'))

# 批量设置值和取值
d = {'k1': "v1", "k2": "v2"}
conn.mset(mapping=d)
conn.set('k3', 'v3')
print(conn.mget('k1', 'k2'))  # 批量获取
print(conn.mget(d.keys()))  # 批量获取
print(conn.keys("*"))  # 获取当前数据库下所有的key

# 如果key存在,返回值的长度,否则返回0
print(conn.strlen('k3'))

# 查
conn.set('k1', 'v1')  # 没有过期时间限制
conn.set('k2', 'v2')  # 没有过期时间限制
print(conn.get('k1'))  # v1
print(conn.keys('*'))
# 删
conn.set('k1', 'v1')  # 没有过期时间限制
print(conn.get('k1'))  # v1
conn.delete('k1')
print(conn.get('k1'))  # None

# 修改,起始就是从新赋值就完了
conn.set('k1', 'v1')
print(conn.get('k1'))  # v1
conn.set('k1', 'v111')
print(conn.get('k1'))  # v111
计数功能
import redis

# 创建连接对象,后续操作都是通过连接对象来操作,方式1
conn = redis.Redis(host='127.0.0.1', port=6379, password='1234', encoding='utf-8', decode_responses=True, db=0)

# ------------------ 字符串计数功能 ------------------
# 每次调用incr命令,num值自加一
conn.set('num', 1)
print(conn.get('num'))
for i in range(5):
    print(conn.incr('num'))

# 一次性累加指定数
conn.set('num', 1)
print(conn.incrby('num', 1000))  # 1001
print(conn.get('num'))  # 1001

# decr 使num自减一
conn.set('num', 10)
for i in range(5):
    print(conn.decr('num'))
print(conn.get('num'))  # 5

# 一次性累减指定数
conn.set('num', 10)
print(conn.decrby('num', 8))  # 2
print(conn.get('num'))  # 2
哈希hash
类似python的字典,但是成员只能是string,专门用于结构化的数据信息
import redis

conn = redis.Redis(host='127.0.0.1', port=6379, password='1234', encoding='utf-8', decode_responses=True, db=0)

# ------------------ hash ------------------
data = {"id": 1, "user": "zhangsan", 'age': 18}

conn.hmset('user1', mapping=data)
conn.hset(name='user2', key="name", value='zhangsan')  # 这种写法没问题
conn.hset(name='user3', mapping=data)  # 这种写法,有问题
print(conn.hget('user3', 'name'))
"""
关于conn.hset(name='user3', mapping=data):
    hmset:
        兼容redis低版本(redis3.2.100)和高版本(redis5.0.7及以上)
        但高版本不推荐使用这个方法了,虽然能用,但是运行有warning
        高版本的redis推荐使用hset来代替hmset
        至于低版本的redis使用hmset有warning的话,请忽略
    hset
        低版本的redis(redis3.2.100)用这个报错:redis.exceptions.ResponseError: wrong number of arguments for 'hset' command
        但高版本的redis就不报错
    最终:如果你用的redis版本较低如Redis3,请用hmset,如果redis版本较高Redis5,请用hset
"""

# 获取指定字段的值
print(conn.hget('user1', 'id'))
# 获取多个字典的值
print(conn.hmget('user1', "id", "user"))
# 返回所有字段和值
print(conn.hgetall('user1'))

# 返回key中所有的字段
print(conn.hkeys('user1'))
# 返回key中所有的字段值
print(conn.hvals('user1'))
# 判断指定字段是否存在,存在返回1,否则返回0
print(conn.hexists('user1', 'id'))
# 返回key中所有字段的数量
print(conn.hlen('user1'))
# 为整型字段的值加固定数字
print(conn.hincrby('user1', "age", 10))
# 为指定字段重新赋值
print(conn.hset('user1', "age", 12))
print(conn.hget('user1', 'age'))

# 当key不存在,创建该key,并且设置上指定的字段和值
print(conn.hgetall('user5'))
print(conn.hsetnx('user5', 'addr2', "beijing2"))
print(conn.hgetall('user5'))

# 当key存在,想要设置的字段和值存在,不生效
print(conn.hgetall('user1'))
print(conn.hsetnx('user1', 'addr', "beijing"))
print(conn.hgetall('user1'))
# 当key存在,指想要设置的字段值如果不存在则设置上该字段和值
print(conn.hsetnx('user4', 'age', 30))
print(conn.hgetall('user1'))
print(conn.hsetnx('user1', 'addr2', "beijing2"))
print(conn.hgetall('user1'))
为hash的key设置过期时间
注意,这里演是为整个hash的key设置过期时间,而不能为其中某个字段设置过期时间:
import time
import redis

conn = redis.Redis(host='127.0.0.1', port=6379, password='1234', encoding='utf-8', decode_responses=True, db=0)

# ------------------ hash ------------------
data = {"id": 1, "user": "zhangsan", 'age': 18}
conn.hmset('user1', mapping=data)
print(conn.hgetall('user1'))
conn.expire('user1', 8)  # 过期时间: 秒
time.sleep(10)
print(conn.hgetall('user1'))
列表list
import redis

conn = redis.Redis(host='127.0.0.1', port=6379, password='1234', encoding='utf-8', decode_responses=True, db=0)

# ------------------ list ------------------
l1 = ['a', 'b', 'c', 'd']
# conn.lpush('l1', 'a', 'b', 'c')
# 批量插入列表
conn.lpush('l1', *l1)
# 如果 key 存在则插入,不存在则什么也不做
conn.lpushx('l1', 'd')
conn.lpushx('l2', 'w')

# 从列表的左侧找到元素a,即不往后找了,然后在元素 a 前面/后面插入一个元素
conn.linsert('l1', 'before', 'c', 'x')
conn.linsert('l1', 'after', 'c', 'z')

# 在列表尾部追加 元素 1   注意,插入的整型元素也会转变为str类型
print(conn.lrange('l1', 0, -1))
# conn.rpush('l1', 1)
# 在列表尾部先追加 2 再追加 3
conn.rpush('l1', 2, 3)
print(conn.lrange('l1', 0, -1))
# 如果列表 l1 存在就将元素4追加到列表尾部,如果列表不存在则什么也不做
conn.rpushx('l1', 4)

# 根据索引下标返回元素
print(conn.lindex('l1', 1))
# 从索引0开始取到-1,也就是从头取到尾,获取列表中的所有元素
print(conn.lrange('l1', 0, -1))
# 取索引 0 1 2 三个索引对应的元素
print(conn.lrange('l1', 0, 2))
# 取索引下标为 2 对应的元素
print(conn.lrange('l1', 2, 2))
# 如果索引不在合法范围内,则取空
print(conn.lrange('l1', 8, 9))
# 返回列表的长度
print(conn.llen('l1'))

# 抛出列表头部/尾部元素
print(conn.lpop('l1'))
print(conn.rpop('l1'))

# 将列表 l1 尾部的元素抛出并且添加到列表 l2 中,l2不存在则自动创建
conn.rpoplpush('l1', 'l2')

# 从左到右,删除指定个数的元素 a1 ,本示例中,若 a1 有 1 个,就删一个,若 a1  有 3 个或者更多,也就删除 2 个
l3 = ['a1', 'a2', 'a1', 'a3', 'a1', 'a4', 'a5']
conn.lpush('l3', *l3)
print(conn.lrem('l3', 2, 'a1'))
print(conn.lrange('l3', 0, -1))
# 保留索引2-4的元素,其余删除
conn.ltrim('l3', 2, 4)
print(conn.lrange('l3', 0, -1))


# 将列表索引为0的元素修改为指定值,如果索引位置不存在则报错
l1 = ['a', 'b', 'c', 'd']
conn.lpush('l1', *l1)
print(conn.lrange('l1', 0, -1))
conn.lset('l1', 0, 'w')
print(conn.lrange('l1', 0, -1))


# 删除列表
conn.delete('l1')
集合set
import redis

conn = redis.Redis(host='127.0.0.1', port=6379, password='1234', encoding='utf-8', decode_responses=True, db=0)

# ------------------ set ------------------
# 增
# 声明集合s1,并添加多个元素,也可以是一个元素,也可以批量添加多个元素
conn.sadd('s1', 'a')
# 对于整型同样转为str, 且元素不能重复,且是无序的
conn.sadd('s1', 'a', 'b', 'c', 1, 2, 3, 1)

# 查
conn.sadd('s1', *{'a', 'b', 'c', 1, 2, 3, 1})
# 返回 s1 中所有元素
print(conn.smembers('s1'))
# 返回 s1 中元素的个数
print(conn.scard('s1'))
# 随机返回集合中的元素
print(conn.srandmember('s1'))
# 判断元素 a 是否存在
print(conn.sismember('s1', 'a'))

# 删除
conn.sadd('s1', *{'a', 'b', 'c', 1, 2, 3, 1})
# 随机删除一个元素,并将这个元素返回
print(conn.spop('s1'))
# 删除整个集合
print(conn.delete('s1'))


# 移动
# 将元素 a 从s1移动到s2中,如果s2不存在,就先创建再移动
conn.sadd('s1', *{'a', 'b', 'c', 1, 2, 3, 1})
print(conn.smove('s1', 's2', 'w'))  # s1中没有该元素则啥也不做,并返回False
print(conn.smove('s1', 's2', 'a'))
print(conn.smembers('s1'))
print(conn.smembers('s2'))
有序集合zset
import redis

conn = redis.Redis(host='127.0.0.1', port=6379, password='1234', encoding='utf-8', decode_responses=True, db=0)

# ------------------ zset ------------------
# 增
score = {
    "zhangsan": 108,
    "likai": 99,
    "wangkai": 100,
    "zhaokai": 102,
}
conn.zadd('score', mapping=score)

# 查, withscores是可选参数,表示同时返回所有成员和分数
print(conn.zrange('score', 0, -1))
print(conn.zrange('score', 0, -1, withscores=True))
# 升序/降序排序返回成员和得分
print(conn.zrange('score', 0, -1, withscores=True))
print(conn.zrevrange('score', 0, -1, withscores=True))

# 返回成员在有序集合中的索引下标,如果成员不存在返回None
print(conn.zrank('score', 'zhangsan'))
print(conn.zrank('score', 'w'))  # None

# 返回成员的总数量
print(conn.zcard('score'))

# 升序返回score中所有成员和分数
print(conn.zrangebyscore('score', '-inf', '+inf', withscores=True))
# # 加减不能调换位置
print(conn.zrangebyscore('score', '+inf', '-inf', withscores=True))

# 升序返回score中分数在 100 <= 分数 <= 200 这个范围内的成员/分数
print(conn.zrangebyscore('score', 100, 200))
print(conn.zrangebyscore('score', 100, 200, withscores=True))

# 返回score中分数在 100 <= 分数 <= 200 这个范围内的成员的数量
print(conn.zcount('score', 100, 200))

# 返回score中所有成员/分数,并且以索引从大到小排序
print(conn.zrevrange('score', 0, -1, withscores=True))

# 返回降序集合score中 0 <= index <= 2 索引范围内的成员
print(conn.zrevrange('score', 0, 2))


# 返回score中分数范围在 120 <= 的 <= 100 范围内的成员,并以大到小降序排序
# 注意,源码中的min和max位置和其他的方法不一样,其他的都是min,max, 这个方法是max,min
# 所以,按下面这么写,你要把大的值放前面
print(conn.zrevrangebyscore('score', 120, 100, withscores=True))
# 或者这样写,指名道姓的传值也行
print(conn.zrevrangebyscore('score', min=100, max=120, withscores=True))

# 改
# 为指定成员重新赋值
print(conn.zrevrange('score', 0, -1, withscores=True))
print(conn.zadd('score',  mapping={"zhangsan": 110}))  # 修改其得分,可以同时修改多个
print(conn.zadd('score',  mapping={"zhangsan": 120, 'sunkai': 12}))  # 修改其得分,可以同时修改多个,也可以添加新的成员
print(conn.zrevrange('score', 0, -1, withscores=True))


# 为指定成员增加指定分数,并返回增加后的分数
print(conn.zscore('score', 'zhangsan'))
print(conn.zincrby('score',  5, 'zhangsan'))
print(conn.zscore('score', 'zhangsan'))

# 删除
# 删除分数在指定范围(包含)内的成员,并返回删除成员的数量
print(conn.zrange('score', 0, -1, withscores=True))
print(conn.zremrangebyscore('score', 90, 100))
print(conn.zrange('score', 0, -1, withscores=True))


# 删除score中指定索引范围内 0 <= index <= 2 的成员,并返回删除成员的数量
print(conn.zrange('score', 0, -1, withscores=True))
print(conn.zremrangebyrank('score', 0, 2))
print(conn.zrange('score', 0, -1, withscores=True))

# 删除score中一个或者多个成员,返回实际删除的个数
print(conn.zrange('score', 0, -1, withscores=True))
print(conn.zrem('score', *{"zhangsan", 'likai'}))
print(conn.zrange('score', 0, -1, withscores=True))

# 删除key
conn.delete('score')
队列操作
消息队列
消息队列是一种消息传递模式,它将消息从发送者传递到一个或多个接收者,而且不需要彼此之间显式的连接。这样做的好处是解耦发送者和接收者。
redis的消息队列使用list类型实现,支持添加、移除队列元素,队列结构为先进先出。
缺陷:不能多个消费者消费同一个消息
示例一
import redis

# 创建连接对象,后续操作都是通过连接对象来操作
conn = redis.Redis(host='127.0.0.1', port=6379, password='1234', encoding='utf-8')

conn.lpush('my_queue', 'root')
conn.lpush('my_queue', 'admin')

# 取值
q1 = conn.brpop('my_queue', timeout=5)
print(q1)  # (b'my_queue', b'root')
print(q1[-1])  # b'root'
print(q1[-1].decode('utf8'))  # root

q2 = conn.brpop('my_queue', timeout=5)
print(q2)  # (b'my_queue', b'admin')

# 由于队列中没有元素了,那么就会等5秒,然后不等了,返回None
q3 = conn.brpop('my_queue', timeout=5)
print(q3)  # None
示例二
最好使用rpop
import time
import random
import redis
from concurrent.futures import ThreadPoolExecutor

pool = redis.ConnectionPool(
    host="127.0.0.1",
    port=6379,
    password="1234",
    db=0,
    max_connections=2,
    decode_responses=True  # 这个参数必须在连接池中声明
)
conn = redis.Redis(connection_pool=pool)


def producer():
    """ 生产者 """
    count = 0
    while True:
        conn.lpush('my_queue', count)
        time.sleep(random.randrange(1, 10))
        count += 1


def customer1():
    while True:
        res = conn.rpop('my_queue')
        if res:
            print('\n消费者rpop,消费了: ', res)
        print('\r消费者rpop啥都没拿到,默认返回{} {}'.format(res, '.' * random.randrange(1, 6)), end='')
        """
        通过上面的打印效果,可以发现,conn.rpop的执行效果是一直取值
        取不到值,返回None之后马不停蹄的接着取值,这个在生产中尽量不用,损耗性能
        """


def customer2():
    while True:
        res = conn.brpop('my_queue', timeout=5)
        print('消费者brpop,消费了: ', res)
        """
        brpop可以设置阻塞时间,比如示例中的5秒
        执行逻辑是这样的:
            取值,取到了就消费掉,也就是赋值给res了,我们可以进行后续的处理
            如果没有取到值,就阻塞5秒,这5秒内拿到值了,就消费掉,然后进行下一轮的阻塞取值
            如果阻塞的5秒内,也没有取到值,就返回None,然后进行下一轮的阻塞取值
        实际开发中,这个用的多一些
        """


if __name__ == '__main__':
    with ThreadPoolExecutor(2) as t:
        # for i in [producer, customer1]:
        for i in [producer, customer2]:
            t.submit(i)
发布订阅
import time
import datetime
import random
import redis
from concurrent.futures import ThreadPoolExecutor


class Product(object):
    def __init__(self):
        # 这个示例中,多个订阅者,应该是多个独立的连接对象,所以不能共用一个连接池,一个订阅者一个脚本文件就没问题
        # self.conn = redis.Redis(connection_pool=pool)
        self.conn = redis.Redis(host='127.0.0.1', port=6379, password='1234', decode_responses=True)
        """
        # 向指定频道发布消息
        self.conn.publish(channel, message)

        # 下面三行一起用
        self.pub = self.conn.pubsub()  # 打开收音机
        self.pub.subscribe(channel)   # 以列表的形式指定一个或者多个频道
            channel: 以列表的形式指定一个或者多个频道['fm97.5', 'fm80.5', 'fm77.5']
                     如果该频道有消息,则都会接收到
        res = self.pub.listen()  # 准备接收消息
        for msg in res:  # 从监听的这些频道中,拿到最新的消息
            print(res)

        # 取消订阅指定频道
        self.pub.unsubscribe(channel)
            channel: 取消订阅一个或者多个频道['fm97.5', 'fm80.5', 'fm77.5']
        """

    def add_channel_msg(self):
        """ 模拟发布消息:往不同的频道中添加消息 """
        # 频道列表
        self.pub_list = ['fm97.5', 'fm80.5', 'fm77.5']
        while True:
            channel = random.choice(self.pub_list)  # 随机选出来一个频道
            msg = datetime.datetime.now().strftime('%Y-%m-%d %H:%M:%S')  # 处理消息
            print(f"{channel},发布消息{msg}")
            self.conn.publish(channel, msg)  # 往指定频道发布消息
            time.sleep(random.randrange(1, 3))

    def subscribe(self, channel):
        """
        不同的消费者,通过传递不同的频道号,订阅该频道的消息
        channel: ['fm97.5', 'fm77.5']
        """
        # 1. 打开收音机
        self.pub = self.conn.pubsub()
        # 2. 调频
        self.pub.subscribe(channel)
        # 3. 监听我订阅的频道(可以是多个)
        return self.pub.listen()  # 准备接收消息,后续就可以循环接受来自该频道发布的消息了


    def get(self, user, channel):
        # 持续接受来自指定(多个)频道的消息
        for msg in self.subscribe(channel):  # channel = ['fm97.5', 'fm77.5']
            print(f"用户{user}接受来自{msg['channel']}的消息: {msg}")
            time.sleep(1)


if __name__ == '__main__':

    with ThreadPoolExecutor(4) as t:
        # 整个连接对象,专门负责发布消息
        t.submit(Product().add_channel_msg)
        user_dict = {
            "zhangsan": {'get': Product().get, 'channel': ['fm97.5', 'fm77.5']},
            "lisi": {'get': Product().get, 'channel': ['fm80.5']},
            "wangwu": {'get': Product().get, 'channel': ['fm97.5']},
        }
        # 模拟三个订阅者,订阅指定频道的消息
        for k, v in user_dict.items():
            t.submit(v['get'], k, v['channel'])
Redis发布订阅优缺点
优点:
Redis的发布订阅支持多个生产者/消费者,同时生产消费消息,优点就是非常简洁,因为它的实现原理就是单纯地为生产者、消费者建立「数据转发通道」,把符合规则的数据,从一端转发到另一端。
缺点:
发布订阅模式是"发后既忘"的工作模式,如果订阅者离线,那么重连之后不能消费之前的历史消息。 无法持久化保存消息,如果 Redis 服务器宕机或重启,那么所有的消息将会丢失。 积压的消息不能太多,否则也会丢数据【可以通过client-output-buffer-limit这个参数配置】。 小结:对于特别简单的发布订阅场景,可以考虑Redis的发布订阅功能,但是复杂的场景,还是选择专业的消息队列软件实现吧。
管道Pipeline
默认执行一次redis操作,都会创建(连接池申请连接)和断开(归还连接池)一次连接操作,如果想要在一次请求中指定多个命令,则可以使用pipline实现一次请求指定多个命令,从而提高性能。
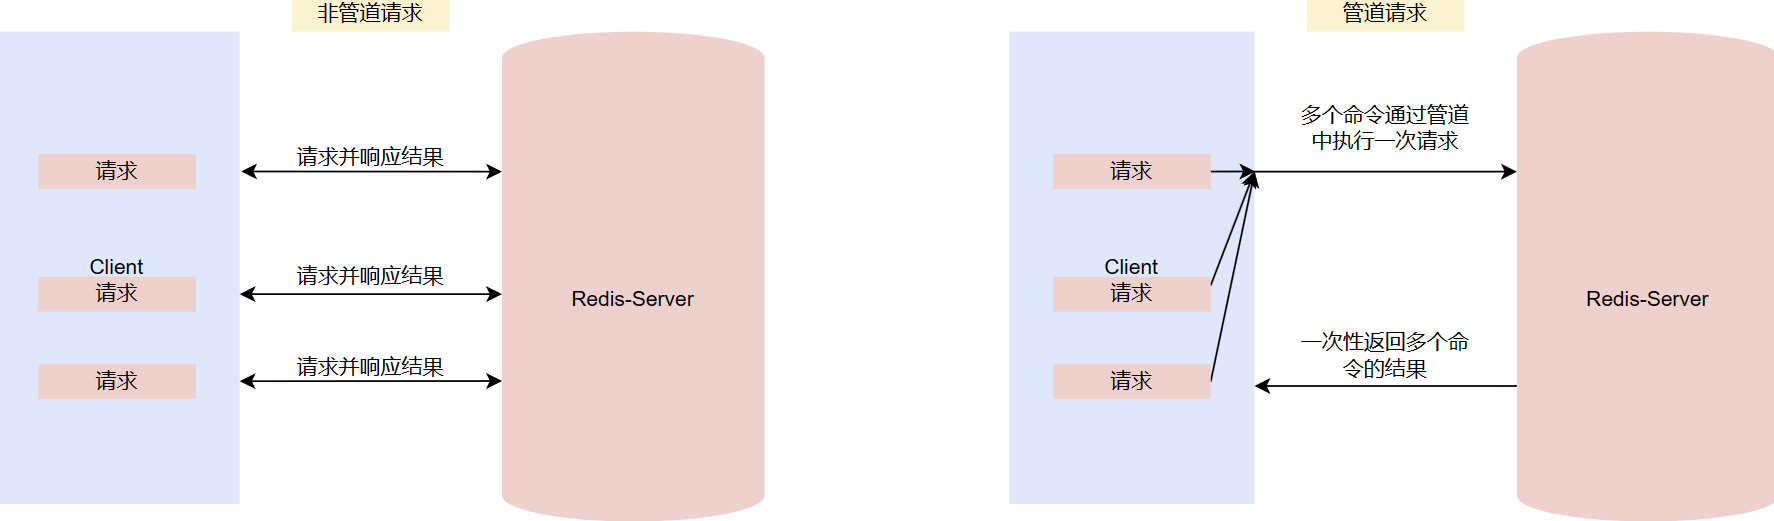
管道技术(Pipeline) 是客户端提供的一种批处理技术,用于一次处理多个 Redis 命令,从而提高整个交互的性能。
管道技术解决了多个命令集中请求时造成网络资源浪费的问题,加快了 Redis 的响应速度,让 Redis 拥有更高的运行速度。但要注意的一点是,管道技术本质上是客户端提供的功能,而非 Redis 服务器端的功能。
注意事项:
发送的命令数量不会被限制,但输入缓存区也就是命令的最大存储体积为 1GB,当发送的命令超过此限制时,命令不会被执行,并且会被 Redis 服务器端断开此链接; 如果管道的数据过多可能会导致客户端的等待时间过长,导致网络阻塞; 部分客户端自己本身也有缓存区大小的设置,如果管道命令没有没执行或者是执行不完整,可以排查此情况或较少管道内的命令重新尝试执行。
import redis

pool = redis.ConnectionPool(
    host="127.0.0.1",
    port=6379,
    password="1234",
    db=0,
    max_connections=2,
    decode_responses=True  # 这个参数必须在连接池中声明
)
conn = redis.Redis(connection_pool=pool)
# ------------------ pipeline基础写法 ------------------
# 再执行多个命令之前,要创建好管道
pipe = conn.pipeline()
# 写法1(推荐)
pipe.set('k1', 'v1')
pipe.set('k2', 'v2')

# 写法2
pipe.set('k3', 'v3').set('k4', 'v4')

# 批量执行多个命令,但注意,返回的是这几个命令的执行情况
res = pipe.execute()
print(res)  # [True, True, True, True]

pipe = conn.pipeline()
pipe.get('k1')
pipe.get('k2')
pipe.get('k3').get('k4')
res = pipe.execute()
print(res)  # ['v1', 'v2', 'v3', 'v4']

# ------------------ with管理pipeline ------------------
with conn.pipeline() as pipe:
    pipe.get('k1')
    pipe.get('k2')
    pipe.get('k3').get('k4')
    res = pipe.execute()
print(res) # ['v1', 'v2', 'v3', 'v4']补充:查看客户端的连接数info clients(客户端本身会有一个)
查看最大连接数CONFIG GET MAXCLIENTS